One of the effects that has always grabbed my attention in photoshop is water. I am going to show you a cool an quick water effect.
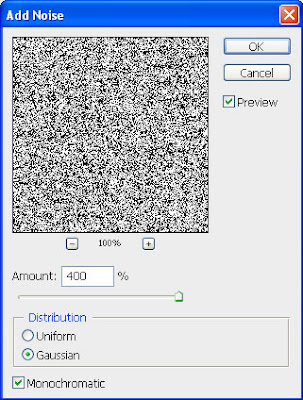
Step 1:First we need to create the water drops. Open up our usual 500 x 500 pixel canvas. Go to the channels palette and create a new alpha channel. Then apply Filter => Noise to the channel. Below are my settings.

Step 2:Now, We are going to blur that layer. So go to Filter => Blur => Gaussian Blur and use a radius of 3 - 4.

Step 3:Then go to Image => Adjustments => Threshold. Move the slider so you have an even distribution of white and black in the image. See my image below for a guide. Keep in mind that the white areas will be your water drops so adjust this according to how many drops you want.
This is my setting:

After Threshold setting your images looks like below.

Step 4:In this setup we are going to hit the image with another Gaussian Blur. This time use a setting around 6.5 - 7.5. Then apply the threshold adjustment to it again. You will see the water droplets starting to appear (the white parts) so adjust your threshold until you are happy with the amout and size of droplets. Then apply the Gaussian Blur filter one last time with a low setting of around 1.5. You should have something like this so far.

Step 5:Now since we have some jagged edges we are going to apply a levels adjustment. Go to Image => Adjustments => Levels or Press Ctrl + L to bring up the levels adjustment box. Drag both the left and right sliders in toward the center slider. Do this until you feel the jaggies are gone.

Step 6: OK, now we have our drops so the fun part starts. If you ever wanted a cow pattern then this would be the place to stop. First go back to your layers palette and create some text. A large thick font will work best here. Then duplicate the text layer and hide one of them (just in case we need to come back to it later). Select the duplicate and go to Layer => Rasterize => Type. We do this because we are going to need to distort the text soon and it needs to be rasterized first. Also, while you are in the layers palette, create a background so we can see the water droplets on it. Used a blue to purple gradient.

Step 7:Create a new layer above your text layer. Go back to your channels palette and Ctrl + click on the water drop alpha channel. This puts a selection around everything that is white. Then go back to your layers palette and fill the selection with white (Make sure your new layer above the text layer is active). Your image should look pretty close to mine so far..

Step 8: Now, drop the fill opacity of the water drops layer down to around 30%. This is located in the top right of the layers palette (It says "Fill: 100%") if you have PS 7. If you're using version 6 it is tucked in the main screen of the layer styles dialog box. Also, change the blending mode of this layer to 'Soft Light'. Then, double click the water drops layer and add a Bevel and a contour layer style. Use the settings in the screenshots below.


Step 9: Almost done. Now we just need to make it a little more lifelike. In real life, if the water drops where on top of something it would distort the view of what is below them. The text here is no exception. So make the text layer active and Ctrl+click on the water drops layer to bring up its selection. Again, make sure the text layer is active though - we only want to affect the areas of text that the water drops are on top of. Then go to Filter => Liquify (this is why we rasterized the text layer earlier). Selected the Warp tool which is the default, 64 for brush size, and 50 for Brush Pressure. Then just barely click on each area under the droplet and pushed it to the right quickly. We are just looking for a little distortion here so don't go crazy. This took me a few times to get it right so if you apply it and don't like it just undo and go back.
Step 10 (Final): Thats pretty much it. Added a hard edged drop shadow layer style to the white text and here is what we came up with.

